Art In the Garden

On a warm day in the garden the students learned about creating art with items found, while gaining ownership over their garden.

IMG_4456

They were inspired by the Garden Educator explaining the art of Andy Goldsworthy.

IMG_4461

As students were collecting items for their projects, questions came up around picking flowers and fruit.

The Garden Educator explained that if there are 10 or more of the specific flower, they could pick a few flowers.

They also learned to wait to pick the passion fruit until it is ripe.

Students identified plants in the garden…lavender, rosemary, succulents, lamb’s ear and more.

Then we had an art walk and students had the opportunity to explain their project, while other students listened and could make comments at the end.

Great day in the garden!

“Finished Projects”

IMG_4458 IMG_4468 IMG_4469

IMG_4462

A classroom for the non-traditional learner

The garden provides non-traditional learners the opportunity to thrive. One of the best parts of my job is the smiles of pride and accomplishment I enjoy on students faces during each lesson, sometimes they are beaming because they remembered to include a scale and key, while mapping their new garden plots, or they are excited about the shockingly accurate leaf shape they created on their paper while doing a botanical drawing.  But my favorite moments are those when student who may not thrive in a traditional educational setting triumphs in the garden.  Last week a student who normally stares at a worksheet for 20 mins , struggling to maintain his attention long enough to answer the first question,  happily tells me “ I’m a really good mulcher” during some  garden maintenance.  The outdoor classroom presents students with learning opportunities that cannot be found in a book behind a desk.

IMG_2114

The garden provides a setting where sitting still, and paying attention, is no longer the keys to success. Instead students are asked to use their bodies, creativity and hands as they explore the world around them. A student that has a difficult time listening gets a chance to shine when he or she is strong enough to accomplish a task a classmate was struggling with. Every time the students enter the garden the playing field is leveled a little bit. No single student stands out as the “smartest” or “best reader”  like the stereotypes they find themselves falling into in the classroom. Instead I enjoy a garden full of the great  “mulchers”, “aphid hunters”, “botanical artists”, and  “cooks”,  thankfully the list never ends.

DSC01002

Best-Ashley

Garden Tacos

Usually when I introduce a lesson involving food the crowd goes wild.  Today the population was particularly demure.  I told a group of 1st graders that we would be making lettuce wraps.  They stared blankly.  I realized that I was not appealing to my target demographic.  I tried again “today we’re going to make garden tacos.”  Deafening enthusiasm ensued.  Silly Mrs. Kjessie, garden tacos are for kids.  Any self-respecting child raised in central CA knows how to get excited over a taco, not a “lettuce wrap.”  Point taken.  After doing 8 incarnations of the tacos and ranch, I noticed that sometimes they loved it and sometimes they just were not wild about it.  I observed a correlation between the lettuce variety and the higher approval ratings.  If we made the “tortillas” out of green leaf lettuce only about 1/3 of the kids liked them.  If we make them out of romaine, about 3/4 of the kids loved them and I even had one very adamant 6 year old say “Oh! Mrs. Kjessie, I just HAAAAAAAVE to get this recipe.”

So, here we are.

“The Salsa” aka

Garden Fresh Ranch Dressing

1/4 Cup Greek yogurt
1/4 Cup Buttermilk
1/2 Garlic clove
Fresh Herbs– We used a handful of Parsley, Thyme, Rosemary and Oregano
1/4 tsp kosher salt
1/2 tsp apple cider vinegar
Fresh ground black pepper to taste
1 tsp sugar or maple syrup or honey

Strip fresh herb leaves from their stems and place in the bottom of a deep measuring cup or jar.  Measure out the rest of the ingredients on top of the herbs. Blend with an immersion blender until smooth.  

“The Tortillas”

  • Preferably Romaine lettuce, washed and dried.  Salad spinners are super fun.

“The Meat”

  • Harvest Carrots and Snap peas.  Wash thoroughly and then cut into small pieces.
  • Roasted Sunflower seeds

To Assemble:

Have kids hold their lettuce tortilla and spread ranch on the bottom, let them fill their taco with carrot & snap pea bits and sprinkle roasted sunflower seeds to top. Voila!

Calendula Flowers In Bloom

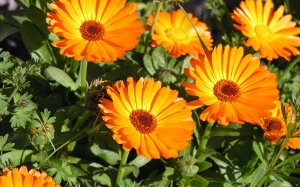
Calendula flowers are awesome.  Part of the daisy family, Asteraceae, calendulas or “pot marigolds”, bring oranges and yellows (also the vectors that accompany such beautiful bursts of color) to any garden.   Calendula can be direct seeded in the spring or even summer or they can be started indoors as transplants. They are very easy maintained and once established in your garden, they will self-seed, but they don’t generally become a nusiance.

Rich soil and a full sun location will keep your calendula blooming, although they will adapt to most any soil conditions. Calendula will slow down in extreme heat and warmer climates will have more success growing them as fall or early spring flowers. In more temperate areas, watering regularly will help keep them going in the peak of summer and your calendula will bloom until frost.

Cutting the flowers off the blooming flowers is a great way to encourage your calendula flower to continue to create new buds.  The more  flowers you cut off the more they will produce!  The flowers, once picked, can be used in numerous ways:

1.  Salads:  Although slightly bitter calendula flowers make a great addition to any salad giving it a vibrancy and glow which more than makes up for the bitter taste.    Taken internally the flowers are said to help digestive issues such as abdominal cramps and constipation

2.  Infusions:  Applied topically calendula flowers are a great remedy to treat various skin conditions such as acne, inflammation, insect skins, rashes and irritated tissue.  Making an infusion is simple:

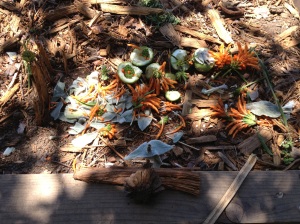
  • Fill a mason jar with dried calendula flowers.  Dried calendula flowers can be obtained by picking the calendula flowers from your plants and drying them in small batches, in a dark ventilated place, on a drying sheet or rack.
  • Add oil to the mason jar full of calendula flowers.  I prefer using olive oil but there are many different oils that can be used such as Coconut, Almond, Jojoba, Sunflower, Grapeseed…etc.
  • Let sit in an airtight container for up to six months.

The oil is now ready to be used by applying it directly to the skin or by creating a salve.  I create salves by mixing equal proportions of the infused oil and beeswax together and heating until liquid.  When it cools the salve is ready to be applied directly to the skin.

3.  Plant dyeing.   Until the late 19th century all colored fabrics were obtained through the extraction of colors from plants and other natural sources.  With the increased focus on sustainability there has been a resurgent interest in dyeing with natural plants.  Calendula will create colors varying from a bright yellow to a khaki green.

To create dyes from herbs, you usually add a mordant. A mordant is an ingredient that binds the dye to the material you are dyeing. Different mordants produce different colors using the same plant materials so your range of colors differs based on which one you choose. Some mordants are alum, iron, tin and vinegar.   Mordants can be added before, during, or after the dyeing process.

  • Place calendula blossoms into a plastic bucket, cover with hot, not boiling, water.  A one-gallon bucket works well for this method.
  • *Note on water quality:  If your water is very alkaline or acidic, high in iron, etc… I suggest using distilled water.  High mineral contents in your water supply will act as a mordant and grossly alter your expected dye colors.
  • Leave this solution to soak, in a warm place, overnight.
  • Remove calendula blossoms from the resultant liqueur, and place onto a screen or screen-like surface to dry.  Once dry you may store, or reuse, the calendula blossoms for future baths.  The color will be lighter, but you will find by allowing them to dry, and then reusing them, you will be able to extract additional color from the blossoms.
  •  Place your calendula liqueur into a dye pot, place pot onto heat source and bring the solution to a simmer.  (See notes on Dye Pots and Utensils)
  • Place your wetted fabrics into the dye pot; simmer for two hours.
  • Remove from heat and allow the fabric to remain in the dye bath, overnight or longer if desired.
  • Allowing the fabric to remain in the dye pot, as the dye bath cools, allows for more of the dye molecules to bind with the fibers.
  • Remove fabric from the dye bath and rinse the fabric thoroughly.  Some dye color will rinse off in the process, this is normal.
  • Line dry the fabric.

For more information on dyeing please check out:

http://makezine.com/craft/101/natural_dyeing/

Calendulas are beautiful and easy!  Utilize them!

calendula 1

Master Gardeners

       The teachers at La Canada Elementary recently came up with a new way to reward students for excellence in reading comprehension. The students with a high number of AR points will be given the title of Master Gardener for a day. The Master Gardeners have a morning off from their regular class schedule and spend time in the garden with their Garden Educator. I was honored to have two of my former garden students win the first Master Gardener titles.

Elizabeth Twomey and Chelsea Berra shadowed and assisted me as I went about my day on February 5th. Their focus and resourcefulness were appreciated as we maneuvered two first and one second grade class through a bug and plant observation lesson that included pastel drawings. They had patience and a sense of humor with the younger children as they handed out art supplies and organized completed works of art.  Their previous skills in planting, properly spacing and watering new vegetable starts came in handy when they helped a fourth grade class fill beds with lettuce plants for the salad bar. The girls had a full day and I was truly proud of their maturity and poise with younger students. It won’t be long before I have more students joining me for the day in the garden.   One excited fifth grader announced, “Only fifty more points and I will be a Master Gardener!”

Apples, Apples, Apples

The curriculum of a 2nd grade class seems to be perfectly geared towards learning in a garden setting.  So far they have studied seasons, consumers and producers, rocks & soil, and are now moving on to natural resources.  When learning about seasons the students created posters with cut out photographs and magazine clippings to demonstrate different associations with their chosen time of year.  A drawing of an apple tree was the center piece of each poster – In Winter the apple tree was bare of leaves and fruit, in Spring the apple tree was covered in tiny blossoms, in Summer tiny fruits were beginning to be visible, and in Fall a basket full of apples sat beside a tree covered in delicious ripe fruit.  What better way to reinforce the idea that certain crops have specific growing seasons,  to begin the discussion on consumer choices, and to demonstrate the necessity for soil as a natural resource than to talk about and EAT apples.

Off I went to Whole Foods.  Oh Whole Foods!  What a variety of apples you have!  Braeburn, Honeycrisp, Jonagold, Pink Lady!  My second graders couldn’t have imagined the variety of apples sitting before them.  We talked about how many varieties of apples exist – “Take a guess”, I asked.  “5”… “14”… “100!” There are 2,500 varieties of apples grown in the United States.  The kids looked shocked.  “How many do you think they usually offer at the grocery store?”  Four.

I led the students through the “Apple as the World” lesson.  I have to admit this was a little difficult for them to comprehend, fractions and water covering the earth, but once you come down to that tiny sliver of apple representing “tillable earth” it became clear that this soil is something we need to protect.  We talked about making educated consumer choices and where they might find a larger variety of apples.  And then we began the tasting.  I encouraged them to use their senses as they took each bite and think of adjectives to describe what they saw and tasted.  “What would you name this apple?”  “Yummy in my Tummy Apple”  “Crunchy Cookie Apple”.  They tasted a few varieties and always asked for more.  I had as much fun (if not more) tasting the apples as they did.  I gotta admit the lesson was a huge success, but I can’t take all the credit.  I mean, what child doesn’t like apples?  I haven’t met one yet.

IMG_6979

Winter Harvesting in 3 Goleta Schools!

Even in this crazy weather we have reaped what we sow!

Three local schools are eating their way through learning.

Brandon had an abundance of parsley this January and so 100 kids were exposed to something new: Quinoa Tabouleh salad. We harvested and de-stemmed parsley and our mint, minced it and added lemon and olive oil and salt to our ancient non-gluten grain, Yum!

At La Patera School the 4th and 2nd graders made salad, harvesting fresh lettuce, chives, parsley and one radish. We ripped it, dressed it and enjoyed it!

El Camino, my newest school, harvested their very first veggie; a 2 2/3 lb cabbage.

We did the math and everyone could enjoy  1 1/2 oz of slaw.

We used our outdoor sink as well!

Fall Fun!

IMG_0012

The students at La Honda Elementary have been working together and with local farmers to support others and their school garden.

This Lompoc school hosts an annual Turkey Trot before Fall Break and three students from each grade win a turkey, a large bag of potatoes or a pumpkin pie as a reward for running the fastest among their peers.

This year, with the help of the School Gardens program, Mrs. McLaren’s 6th graders hosted a mini-market booth featuring a beautiful display of kale, chard, cilantro, braising greens mix, winter squash, corn, eggplant, apples and strawberry plants, amongst other things.

All of the produce at the booth was available for a suggested donation.  The students raised $95 to support La Honda’s school garden!

The students also planned a pumpkin stand; they wrote appeal letters requesting support and pumpkin donations, advertised the fundraiser, and measured and priced the pumpkins for sale.

On the first day of the pumpkin fundraiser, students from all grades swarmed the booth to check out and pick from the selection of pumpkins. It turned out to be an amazing opportunity to illustrate the value of working together to support others in need.  We sold over 35 pumpkins and raised over $100!

Thank you to SLO Creek Farms, Sunny Acres Farm and Cal Poly for their support of our projects!  We are changing our perception of food, where it comes from, and why we need it to be healthy and available to all.

Should you establish rules for your garden?

rulesAs a garden educator at Ellwood and Isla Vista Schools in Goleta, I’m often ambivalent about garden rules. On one hand, we need to ensure safety for plants and especially students entrusted to us. On the other hand, these kids are bound by rules, walls, and fluorescent lights all day every day, and the garden is a great escape, an oasis. Are too many garden rules stifling their joy? If we want to foster stewardship values and behaviors in these students, shouldn’t we encourage any connection to nature that these kids choose to make, even if a lizard or two dies in the process?  Reasonable people might disagree.

Please read this thoughtful article regarding these questions and more about our role as environmental educators.

December Garden

December Garden

Had a lovely day at Pine Grove yesterday, we drank apple cider with chamomile, read about possible winter break projects-designing a garden and identifying water sources or doing some writing about plant and animal cells, then we sang carols around the tree in the garden.
Thank you, Colleen and it was great to meet some of the amazing students of Pine Grove!